Quickstart#
This package generates synthetic images using the Dead Leaves Model, a process in which random shapes (leaves) are repeatedly layered until the canvas is fully covered.
The workflow consists of three steps:
Geometry: A
LeafGeometryGeneratordefines the geometry of the leaves, e.g. shape, size, orientation.Appearance: The
LeafAppearanceSamplerdefines the surfaces of the leaves, i.e. color and texture specifications.Rendering: The
ImageRendereris used to generate the final image.
This Quickstart walks you through the basic usage.
Import#
Begin by importing the two core classes:
from deadleaves import LeafGeometryGenerator, LeafAppearanceSampler, ImageRenderer
Setting up a Model#
The LeafGeometryGenerator controls only the geometry of the leaves and the canvas size.
You choose a leaf shape (circles, ellipses, rectangles, or regular polygons) and assign sampling distributions to that shape’s parameters.
Leaf positions are sampled uniformly on the canvas.
For example, circles require only one parameter: area.
Here we use a power-law distribution for the area:
model = LeafGeometryGenerator(
    leaf_shape = "circular",
    shape_param_distributions = {"area": {"powerlaw": {"low": 100.0, "high": 10000.0, "k": 1.5}}},
    image_shape = (512,512)
)
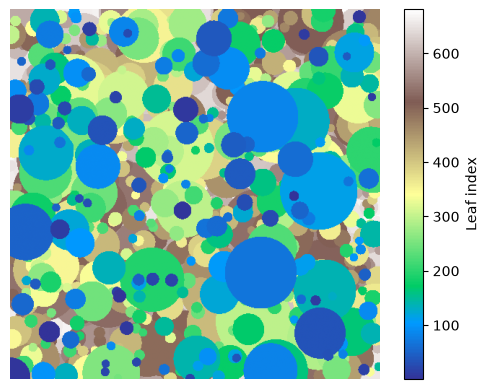
To generate a sample, use .generate_segmentation().
This will trigger a sampling process where in each iteration a sample for each leaf parameter is drawn (in our example the parameters are x_pos, y_pos, and area).
The parameters samples are then used to generate a leaf mask which is placed on top of the canvas and each pixel which does not jet belong to a leaf will be assigned to the current leaf through a leaf_idx, i.e. we add leaves to the canvas from front to back with occlusion.
This process is repeated until all pixels belong to an object.
After the sampling process we receive two outputs:
a pandas DataFrame describing all generated leaves (location + shape parameters), and
a segmentation map assigning each pixel to the leaf on top at that location.
leaf_table, segmentation_map = model.generate_segmentation()
leaf_table.head()
| x_pos | y_pos | area | leaf_idx | leaf_shape | |
|---|---|---|---|---|---|
| 0 | tensor(392.9205) | tensor(257.8438) | [tensor(149.8707)] | 1 | circular |
| 1 | tensor(151.2091) | tensor(396.5372) | [tensor(265.4396)] | 2 | circular |
| 2 | tensor(54.0874) | tensor(445.9986) | [tensor(686.8447)] | 3 | circular |
| 3 | tensor(238.5370) | tensor(277.9781) | [tensor(471.9434)] | 4 | circular |
| 4 | tensor(483.4484) | tensor(9.8379) | [tensor(260.2546)] | 5 | circular |
Each shape type has required parameters, and each of those parameters must be assigned a sampling distribution.
Tip
Since the sampling process is random you will generate a new segmentation map each time the command .generate_segmentation() is called.
For reproducibility you may set a seed with torch.manual_seed().
Using distributions#
You can specify parameter distributions using dictionaries. The package includes common PyTorch distributions and several custom ones:
Name |
Required keys |
Notes |
|---|---|---|
|
|
|
|
|
|
|
|
|
|
|
|
|
|
|
|
|
|
|
|
|
|
|
|
|
|
deterministic |
Each parameter is defined by a dictionary of the form:
{"distribution_name": { ... parameters ...}}
Define leaf appearance#
The LeafAppearanceSampler is used to sample a colors and optionally textures for each leaf in the leaf_table.
To trigger sampling you pass the color mode and the color distributions to the .sample_color() method.
This will draw a sample from your color distribution for each leaf index and save the value to the leaf_table.
colormodel = LeafAppearanceSampler(leaf_table)
leaf_table_w_o_texture = colormodel.sample_color(color_param_distributions = {"gray": {"normal": {"loc": 0.5, "scale": 0.2}}})
leaf_table_w_o_texture.head()
| x_pos | y_pos | area | leaf_idx | leaf_shape | color_R | color_G | color_B | color_gray | |
|---|---|---|---|---|---|---|---|---|---|
| 0 | tensor(392.9205) | tensor(257.8438) | [tensor(149.8707)] | 1 | circular | 0.334278 | 0.334278 | 0.334278 | 0.334278 |
| 1 | tensor(151.2091) | tensor(396.5372) | [tensor(265.4396)] | 2 | circular | 0.692737 | 0.692737 | 0.692737 | 0.692737 |
| 2 | tensor(54.0874) | tensor(445.9986) | [tensor(686.8447)] | 3 | circular | 0.639995 | 0.639995 | 0.639995 | 0.639995 |
| 3 | tensor(238.5370) | tensor(277.9781) | [tensor(471.9434)] | 4 | circular | 0.688381 | 0.688381 | 0.688381 | 0.688381 |
| 4 | tensor(483.4484) | tensor(9.8379) | [tensor(260.2546)] | 5 | circular | 0.562521 | 0.562521 | 0.562521 | 0.562521 |
Adding texture (optional)#
You can optionally add texture on top of the leaf colors. The simplest example uses pixel-wise Gaussian noise:
leaf_table_w_texture = colormodel.sample_texture(texture_param_distributions = {"gray": {"normal": {"loc": 0, "scale": {"uniform": {"low": 0.01, "high": 0.05}}}}})
leaf_table_w_texture.head()
| x_pos | y_pos | area | leaf_idx | leaf_shape | color_R | color_G | color_B | color_gray | texture_gray_dist | texture_gray_loc | texture_gray_scale | |
|---|---|---|---|---|---|---|---|---|---|---|---|---|
| 0 | tensor(392.9205) | tensor(257.8438) | [tensor(149.8707)] | 1 | circular | 0.334278 | 0.334278 | 0.334278 | 0.334278 | normal | 0 | 0.011293 |
| 1 | tensor(151.2091) | tensor(396.5372) | [tensor(265.4396)] | 2 | circular | 0.692737 | 0.692737 | 0.692737 | 0.692737 | normal | 0 | 0.034327 |
| 2 | tensor(54.0874) | tensor(445.9986) | [tensor(686.8447)] | 3 | circular | 0.639995 | 0.639995 | 0.639995 | 0.639995 | normal | 0 | 0.035005 |
| 3 | tensor(238.5370) | tensor(277.9781) | [tensor(471.9434)] | 4 | circular | 0.688381 | 0.688381 | 0.688381 | 0.688381 | normal | 0 | 0.016551 |
| 4 | tensor(483.4484) | tensor(9.8379) | [tensor(260.2546)] | 5 | circular | 0.562521 | 0.562521 | 0.562521 | 0.562521 | normal | 0 | 0.012967 |
Rendering the image#
To render our sampled image we pass the leaf_table and segmentation_map to the ImageRenderer.
If no segmentation_map is provided the segmentation will be regenerated based on the leaf table.
In this case an image_shape has to be given.
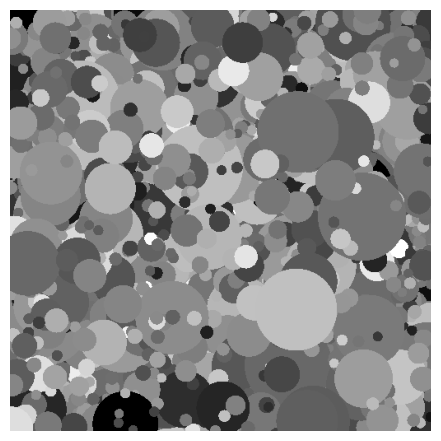
The rendering is performed by assigning each pixel in the canvas the color value of the leaf it belongs to. We can render the dead leaves image without texture by using our leaf table without texture.
renderer = ImageRenderer(leaf_table_w_o_texture, segmentation_map)
renderer.render_image()
renderer.show()
To render the image with texture we use the leaf table which also contains texture information. Since the texture adds pixelwise information we only resolve the texture at rendering time, such that the specific noise pattern will be resampled each time we render.
renderer = ImageRenderer(leaf_table_w_texture, segmentation_map)
renderer.render_image()
renderer.show()
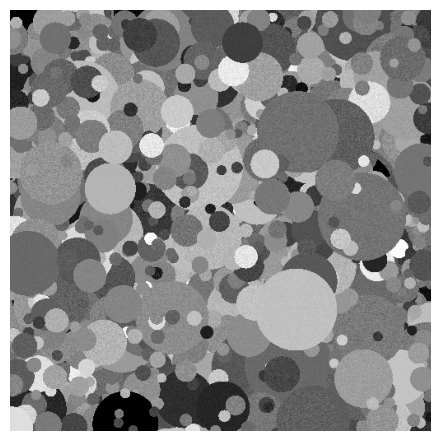
Note
Since we added the texture to our existing model the two above images only differ in the leaf texture.
Full example#
Putting everything together, a complete workflow looks like this:
# Define geometric model
model = LeafGeometryGenerator(
    leaf_shape = "circular",
    shape_param_distributions = {"area": {"powerlaw": {"low": 100.0, "high": 10000.0, "k": 1.5}}},
    image_shape = (512,512)
)

# Sample segmentation of canvas
leaf_table, segmentation_map = model.generate_segmentation()

# Define appearance sample
colormodel = LeafAppearanceSampler(leaf_table)

# Sample colors and textures
colormodel.sample_color(color_param_distributions = {"gray": {"normal": {"loc": 0.5, "scale": 0.2}}})
colormodel.sample_texture(texture_param_distributions = {"gray": {"normal": {"loc": 0, "scale": 0.05}}})

# Display the result
renderer = ImageRenderer(colormodel.leaf_table, segmentation_map)
renderer.render_image()
renderer.show()
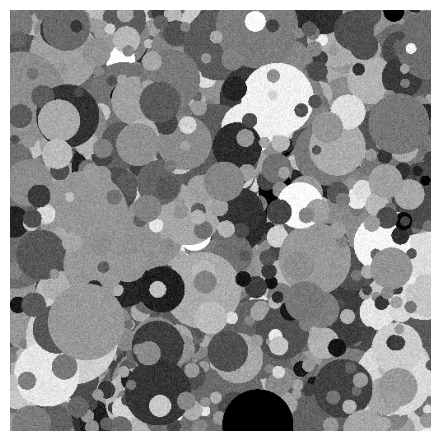
Note
Since the rendering process simply adds the color (and texture) based on the partition to the canvas the resulting dead leaves image has a pixel-perfect rendering and a know segmentation map.
Next steps#
See the documentation on shape parameters.
Learn more about color models.
Learn more about texture models.
Browse examples in the Gallery for example scripts.
Consult the full list of available distributions.